To be completed when we know what we are doing!!
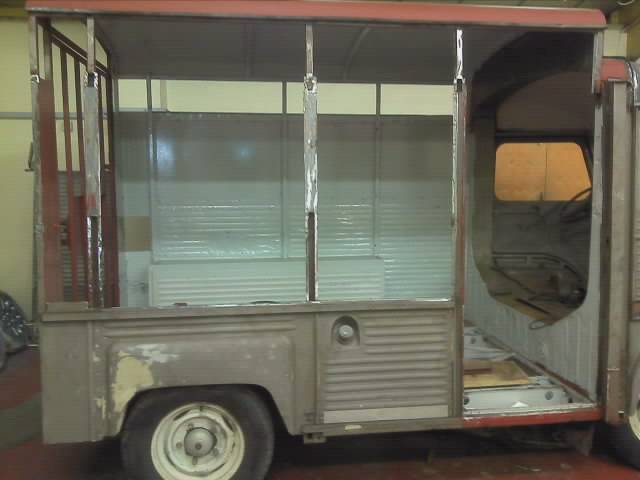
This picture below shows just how little space we have but the plan is to try and squeeze in 6 seats and 6 beds!!

We need to start putting more time into planning the interior. It is this stage of the build the details become important, such as thinking about the location of the Fridge Gas chimney which we want to exit on the roof with less visual impact than side vents. Location of the water tanks, now is a good time to put them in while the floor is still open. How will we fill the tanks without an unsightly filler flap?
Cable and pipe runs, dictated by the appliance location, need to be thought out and space made. Balancing the weight in the van is also an important consideration as we don't want all the heavy kitchen appliances like microwave, cooker and Fridge to be at the rear with the water tanks, etc.
Some thinking has already taken place, such as when the above side panel closest to the camera is rebuilt we will be adding additional square tube inside to provide extra wall strength for the two fold away bunks beds that will pivot off this wall. the space is about 1.8 metres long from the van rear to the back edge of the side sliding door opening. This will hopefully mean we can create 2 roomy bunks big enough for small adults. This side of the van will be the 'walkway' from the side door through to the rear Veranda so keeping the wall space clear will be important, hence the fold up bunks location here.
There has been some discussion about putting the Fridge at the back of the Van on the near side so that the heat exchanger vents to the rear to warm up the Veranda awning area. In the Summer this area will all be open so the heat will be carried away quickly and in Winter it will be enclosed by the awning and need all the heat it can get. This location of the Fridge will hopefully also remove the need for unsightly vents?
On the far wall in the photo, nearside rear corner will sit the Fridge, so it can be opened when the front double bed is in position. To the left of the Fridge a hob, a sink to the right with cupboards and work surfaces running around and across the back of the van. The second double bed will be stored on the back of these kitchen units and extend out onto the Veranda when required. This bed will convert into a seat by day with a flip up table rising from the floor/rear ramp.
On the far wall, near side to the kerb, there will be high level storage racks for the bedding. Floor space will be at a premium so we need to make use the height of the walls. Maybe have 'above head' roof nets for storage?
The driver and passenger seats will remain period.
Behind them just inside the sliding door will be the location for the 4 extra seats, 2 childrens facing forward, 2 Adults facing rearwards, that we hope will convert into a double bed. We are not going for a crash tested unit as per a VW Camper as these are normally turned through 180 dgrees so the crash/impact loading will be completely different.
I want to try and locate the Fresh water tank on the side opposite to the 'heavy' kitchen and as far to the front as I can, probably under the floor by the sliding side door. This will balance the van and allow a filler pipe to run forward into the engine bay where the water filler neck will be located, out of the way and without an unsightly flap in the side. It means lifting the bonnet to fill up with fresh water but that provides an opportunity for onlookers to see the unique bonnet stay!!
Over the next 2 weeks I will sit down with a scale floor plan and draw everything out, from Water tank location to cable runs.